Setting up your Project
Once you get the hang of Python and have installed a code editor such as Visual Studio Code, it’s time to start working on your own project and utilize the various tools that greatly improve the quality of a model.
By applying the structure described here right from the start, you ensure that anything you build is maintainable and scalable. This is especially important when sharing your model with others or using it long-term.
Managing your Project
Starting a new project begins with creating an empty folder named after the project (e.g., “FinanceToolkit”). Then, open this folder in your code editor and initialize Git using git init (or clone an existing remote repository using git clone URL). Afterwards, I typically connect to a remote repository using git remote add origin URL, enabling me to commit, push, and pull changes.
Once this is done, I include the following files to help manage the project. These files are always present in my projects; in fact, I often copy them from the Finance Toolkit repository as it serves as an excellent starting template. This applies to both personal and professional projects.
This consists of the following files:
- README.md: Includes a (short) description of the repository with useful links, similar to the file you are currently reading.
- .gitignore: Includes Python-specific and project-specific exclusions (e.g.,
.idea,.vscode,.venv,.pytest_cache,.DS_Store). See an example here. - pyproject.toml: Includes build setups, linter configurations, and dependencies (example). This file is central to the project, containing all necessary information to run it. It succeeds the older
setup.pyandsetup.cfgfiles. Read more about it in PEP 518. - .pre-commit-config.yaml: A configuration file for
pre-commit. It specifies which linters should run before code is committed, helping maintain high code quality (example). Activate it by runningpre-commit installin the terminal.
The objective of these files is to increase the longevity of the model. For example, if you are still using append in Pandas, you haven’t kept up with package dependencies, as this functionality was deprecated in v1.4.0 (January 2022). Failing to keep up with these developments means that without code changes, you’ll be stuck on older versions like Pandas v1.4.0 and consequently, older Python versions like 3.8 and 3.9.
Directory Structure
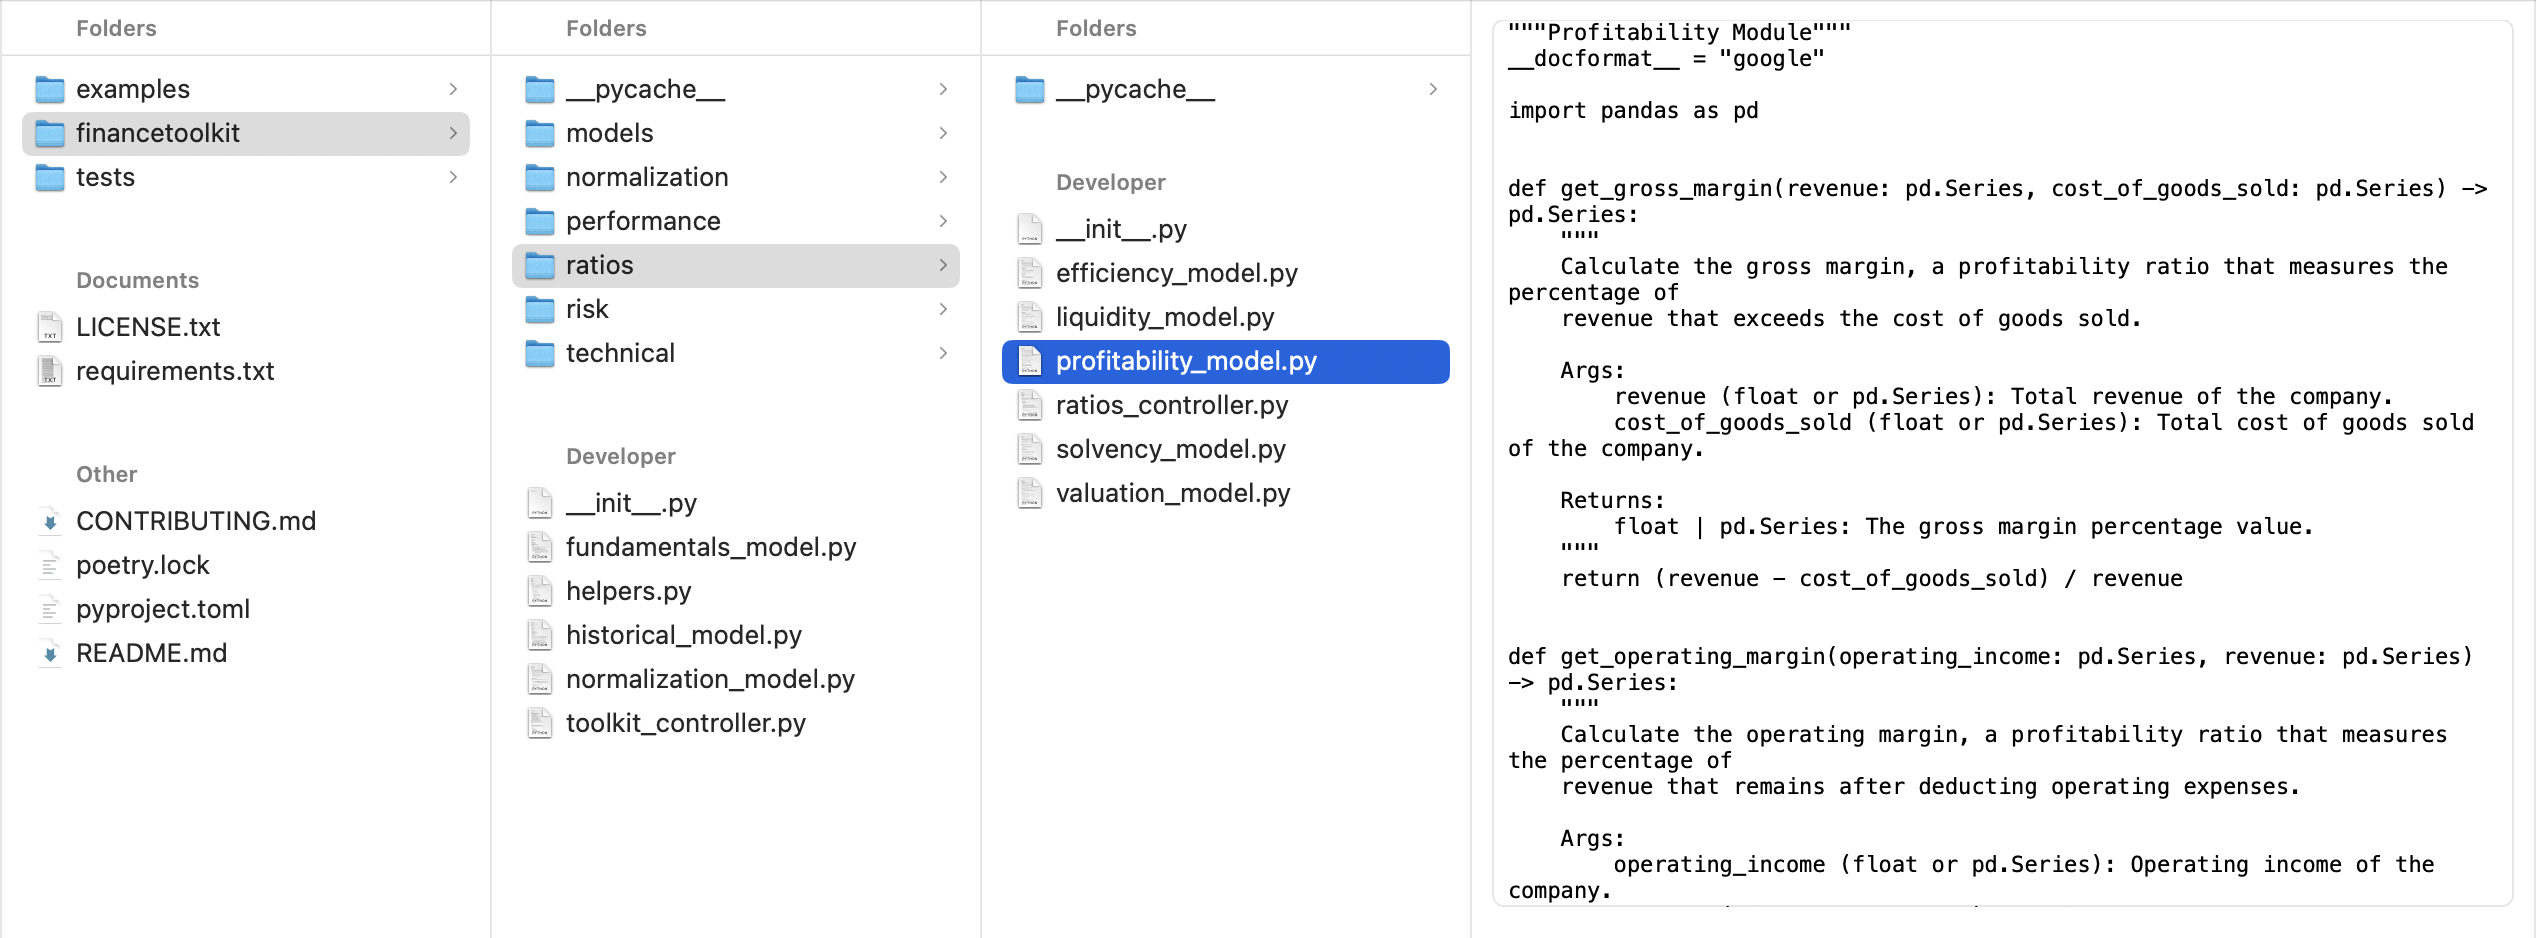
The folder structure could look like the following, with emphasis on the financetoolkit folder containing the actual financial models:
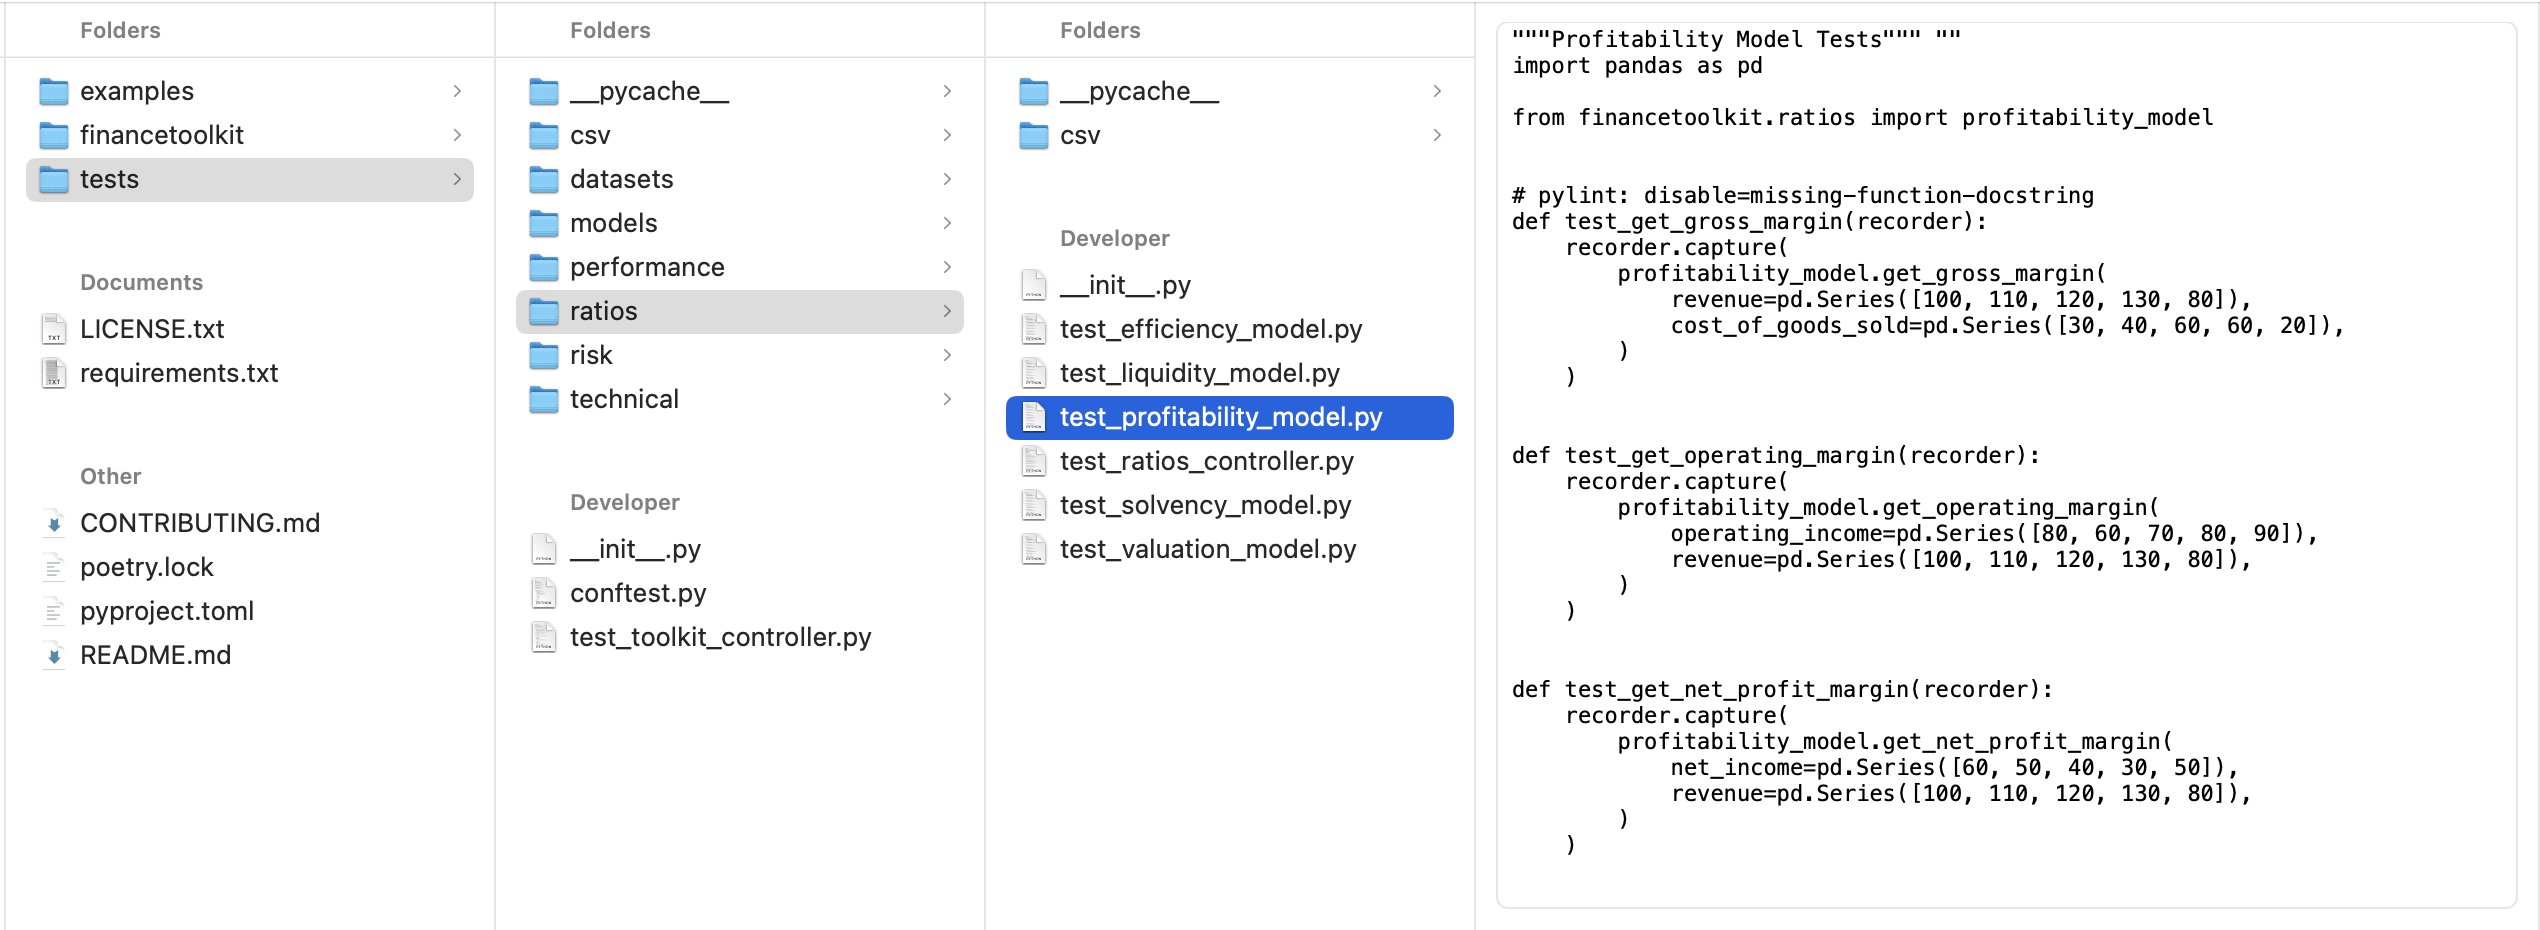
The tests folder mirrors this structure but contains unit tests for pytest:
While this structure can be modified, the key is to organize the model in a way that is understandable and maintainable for yourself and others.
For instance, my FinanceToolkit package follows this exact structure. This isn’t an isolated case; you’ll find a similar structure in projects like OpenBB, a major open-source finance project. This structure can also be expanded, for example, by adding _view modules.
In any case, using the structure described above clarifies the location and purpose of each file, as discussed further in Structure your Model.
Dependency Management
The chances of your model remaining functional over the next few years increase significantly if you keep its dependencies up to date. This involves defining the minimum required versions of Python, Pandas, NumPy, SciPy, and other libraries for the model to function correctly. It would look something like this in the pyproject.toml file:
[tool.poetry.dependencies]
python = ">=3.10, <3.13"
pandas = {extras = ["computation", "performance", "plot"], version = "^2.1.0"}
requests = "^2.31.0"
scikit-learn = "^1.3.1"

[tool.poetry.group.dev.dependencies]
pytest = "^7.4.1"
pylint = "^2.17.5"
codespell = "^2.2.5"
black = "^23.7.0"
pytest-mock = "^3.11.1"
pytest-recording = "^0.13.0"
pytest-cov = "^4.1.0"
ruff = "^0.0.287"
pytest-timeout = "^2.1.0"
pytest-recorder = "^0.2.3"
ipykernel = "^6.25.2"
This example uses the dependency manager Poetry, an advanced tool that understands the relationships between packages and their dependencies. It can also create a virtual environment and install all dependencies within it. This helps keep dependencies managed and ensures you avoid using deprecated functions. Poetry has extensive documentation, which is recommended reading here.
Once set up, you can add dependencies using poetry add (e.g., poetry add pandas). This command adds the package (like pandas) to the [tool.poetry.dependencies] section. With dependencies listed, running poetry install installs them all within the virtual environment. This command also creates a poetry.lock file, which records the exact versions of all installed packages and their sub-dependencies. This file ensures reproducible builds by locking dependency versions.
Pro-tip: Keeping track of new versions for every package can be tedious. Therefore, consider using extras as defined with Pandas. These optional dependency groups bundle related packages (like those needed for data wrangling), simplifying maintenance. See here.
Additionally, the [tool.poetry.group.dev.dependencies] section lists dependencies relevant only for development. As a user running the model, you only need the core dependencies listed under [tool.poetry.dependencies]. As a developer, you need these additional tools for tasks like running tests, linting, etc.
Why Poetry over requirements.txt or pip?
Poetry is a true dependency manager that understands the relationships between packages. Unlike requirements.txt, which merely lists packages and doesn’t prevent incompatible installations, Poetry resolves dependencies intelligently. Pip is a package installer, not a dependency manager, making it less suitable for maintaining consistent environments. While alternatives like pipenv exist, Poetry is preferred here, partly due to its increasing popularity.
Here’s an example of what the installation process looks like:
(modelling) FinanceToolkit % poetry install
Installing dependencies from lock file

Package operations: 72 installs, 0 updates, 0 removals

  • Installing six (1.16.0)
  • Installing asttokens (2.4.1)
  • Installing executing (2.0.0)
  • Installing idna (3.4)
  • Installing multidict (6.0.4)
  • Installing parso (0.8.3)
  • Installing platformdirs (3.11.0)
  • ...

Installing the current project: financetoolkit (1.6.1)
And here’s how adding a new dependency (including extras) appears:
(modelling) FinanceToolkit % poetry add pandas --extras "computation performance plot"
Using version ^2.1.2 for pandas

Updating dependencies
Resolving dependencies... (1.6s)

Package operations: 15 installs, 0 updates, 0 removals

  • Installing pytz (2023.3.post1)
  • Installing tzdata (2023.3)
  • Installing contourpy (1.2.0)
  • Installing cycler (0.12.1)
  • Installing fonttools (4.44.0)
  • Installing kiwisolver (1.4.5)
  • Installing llvmlite (0.41.1)
  • Installing pandas (2.1.2)
  • Installing pillow (10.1.0)
  • Installing pyparsing (3.1.1)
  • Installing bottleneck (1.3.7)
  • Installing matplotlib (3.8.1)
  • Installing numba (0.58.1)
  • Installing numexpr (2.8.7)
  • Installing xarray (2023.10.1)
This addition will then be reflected in the pyproject.toml file:
[tool.poetry.dependencies]
python = ">=3.10, <3.13"
pandas = {extras = ["computation", "performance", "plot"], version = "^2.1.2"}  <-- Added
requests = "^2.31.0"
scikit-learn = "^1.3.1"
Setting up Linters
Linters are tools that analyze code to detect errors, enforce style guidelines, and suggest improvements. They range from code formatters and spell checkers to tools identifying potential bugs or security vulnerabilities. The following linters are recommended to ensure code quality and consistency before committing changes via Git:
- Black: A PEP 8 compliant opinionated formatter, maintained by the Python Software Foundation.
- Ruff: An extremely fast linter that consolidates the functionality of tools like Flake8 (and its plugins), isort, pydocstyle, yesqa, eradicate, pyupgrade, and autoflake.
- Pylint: Checks for errors, enforces a coding standard, looks for code smells, and suggests potential refactoring.
- mypy: A static type checker that verifies type hints (PEP 484) to help ensure correct usage of variables and functions.
- bandit: Designed to find common security vulnerabilities in Python code.
- codespell: Identifies common misspellings in code and text files.
These linters can be configured within the pyproject.toml file, as shown below:
[tool.ruff]
line-length = 122
select = ["E", "W", "F", "Q", "W", "S", "UP", "I", "PD", "SIM", "PLC", "PLE", "PLR", "PLW"]
ignore = ["S105", "S106", "S107", "PLR0913", "S310", "S301"]
exclude = ["conftest.py"]

[tool.pylint]
max-line-length = 122
disable = ["R0913", "W1514", "R0911", "R0912", "R0915", "R0801", "W0221", "C0103", "E1131"]

[tool.ruff.isort]
combine-as-imports = true
force-wrap-aliases = true

[tool.isort]
profile = "black"
line_length = 122
skip_gitignore = true
combine_as_imports = true

[tool.codespell]
ignore-words-list = 'te,hsi'
skip = '*.json,./.git,pyproject.toml,poetry.lock,examples'

[tool.mypy]
disable_error_code = "misc"
The .pre-commit-config.yaml file configures which linters should be run automatically before code is committed. Running pre-commit install sets up Git hooks based on this file.
I recommend downloading this .pre-commit-config.yaml file as a starting template for your projects. Feel free to modify it, but it provides a solid foundation using common linters.
With the hooks installed, these checks will run automatically on each git commit. For example, the output during a commit might look like this:
(base) FinanceToolkit % git commit -m "v1.5.0 Release featuring Threading"
check for merge conflicts................................................Passed
detect private key.......................................................Passed
black....................................................................Failed
- hook id: black
- files were modified by this hook

reformatted financetoolkit/fundamentals_model.py

All done! ✨ 🍰 ✨
1 file reformatted, 1 file left unchanged.

ruff.....................................................................Failed
- hook id: ruff
- exit code: 1

financetoolkit/helpers.py:75:33: PLR2004 Magic value used in comparison.
Found 1 error.

codespell................................................................Passed
mypy.....................................................................Passed
pylint...................................................................Passed
This output shows which linters passed and failed based on the files staged for the commit. In this example, Black failed because it needed to reformat a file, and Ruff failed because it detected a ‘magic value’ (a hardcoded number without clear meaning). There are several ways to address these failures:
- Refactor: Introduce a named constant for the magic value. This is generally the preferred approach as it improves code readability.
- Suppress: Add a
# noqacomment to the specific line causing the issue. This is suitable if the code is already self-explanatory despite the linter warning (e.g.,if len(df.columns) == 1: # noqa). - Configure: Add an exception rule in the
pyproject.tomlor.pre-commit-config.yamlfile to ignore this specific error type project-wide. This is generally discouraged as it hides potential issues, but might be acceptable in specific circumstances.
After resolving the issues (e.g., by letting Black reformat and refactoring the magic value, then staging the changes again), the commit can proceed. The benefit of pre-commit hooks is that code quality checks run automatically before the commit is finalized.
(base) FinanceToolkit % git commit -m "v1.5.0 Release featuring Threading"
check for merge conflicts................................................Passed
detect private key.......................................................Passed
black....................................................................Passed
ruff.....................................................................Passed
codespell................................................................Passed
mypy.....................................................................Passed
pylint...................................................................Passed
[main eb9140d] v1.5.0 Release featuring Threading
 5 files changed, 683 insertions(+), 729 deletions(-)
Creating a Git Workflow
When working with code, it’s important to follow a solid Git workflow that separates development from production environments. The complexity of the workflow can depend on whether you are working alone or in a team; avoid unnecessary complexity. For example, requiring self-approval of Pull Requests (PRs) from a feature branch is unnecessary if you are the sole developer.
Using Git is highly recommended even for private projects. Platforms like GitHub offer private repositories for this purpose. The key benefit of Git is version control: you can easily track changes, revert to previous states if mistakes are made, and manage different versions or features concurrently.
A common approach, especially for solo developers, involves at least these branches:
- main: This branch represents the stable, production-ready code. Direct pushes to
mainshould be avoided; changes should be merged from a development branch. - develop: This branch contains the latest development changes, potentially unstable but integrating new features. If working alone, you might push directly here. In a team, changes are typically merged from feature branches.
This leads to a workflow visualized as follows:
When working in a team, a more structured workflow involving code reviews and testing is crucial before merging into the develop branch. This prevents issues in one feature branch from affecting others. Additional branches often used in team workflows include:
- feature/*: These branches are created for specific new features or tasks. Work is done here, and changes are merged into
develop(usually via Pull Requests). Feature branches are typically deleted after merging. The graph below simplifies this by showing a single ‘feature’ branch, but many exist in practice. - hotfix/*: These branches are used to address critical bugs found in the production (
main) branch that require immediate fixes. They branch offmainand are merged back into bothmainanddevelop.
This team workflow can be visualized as:
This is one common way to structure Git workflows; many variations exist (e.g., Gitflow, GitHub Flow). The key principle is to establish a workflow that suits your project and team, clearly separating production code from ongoing development.
Adding Git Exceptions
The .gitignore file specifies intentionally untracked files that Git should ignore. This is useful for excluding generated files (like compiled code), local configuration (IDE settings), sensitive data, or temporary files (like Jupyter Notebook checkpoints). This file is essential when using version control. If you aren’t already using Git, consider adopting it for its powerful change tracking and versioning capabilities.
An example .gitignore file might look like this:
# FinanceToolkit Specific
*.ipynb
!examples/*.ipynb

# Byte-compiled / optimized / DLL files
__pycache__/
*.py[cod]
*$py.class
.DS_Store
.ipynb_checkpoints/
.DS_Store

# C extensions
*.so

# Distribution / packaging
.Python
build/
develop-eggs/
dist/
Once these setup steps are complete, it’s time to focus on structuring your model’s code. Visit Structure your Model to continue!